

Hi sweet people! Today I want to share a tutorial with you how to make little embellishments using stamps. I used the embellishments in this canvas I created.
Cześć wszystkim! Dziś mam dla Was kurs na ozdoby z użyciem stempli - możecie je zobaczyć na powyższym blejtramie.
I started the piece by creating the embellishment tiles for which you find a tutorial below. Then I grabbed my jar of gel medium and gesso and started clustering. Using gel medium as an adhesive I glues the tiles to the background and added 3rd Eye chipboard pieces, flowers and lamps to the mix. Then I let the gel medium to dry.
Blejtram zaczęłam od ozdób - płytek - na które kurs znajdziecie poniżej. Następnie złapałam słoik z medium żelowym i zabrałam się za komponowanie pracy. Medium żelowego użyłam jako spoiwa, przykleiłam nim płytki, tekturki, kwiaty i inne elementy. Kolejnym krokiem było...czekanie aż medium wyschnie.
After that I painted the whole thing with gesso and then started layering mists on top. As the gesso creates a non-porous surface and most of the mists are designed on a porous surface you need to add color gradually building layers. I also added some flicks of mist, stamping and pencil doodling to the creation. Lastly I adhered the 3rd Eye flair button to the center of a flower and the word stickers to the other side of the canvas.
Cały blejtram pomalowałam gesso, spryskałam gamą mgiełek, stemplowałam i rysowałam. Na koniec dodałam badzik na środku kwiatka i naklejki po prawej stronie.
Thank you for looking! Hope you'll find the tutorial below helpful!
Dziękuję za uwagę! Mam nadzieję, że moja instrukcja jest dla Was pomocna!


Products used: Użyte produkty:


Tutorial for the embellishments: Kurs na płytkowe ozdoby:
 |
What you'll need:
- (air drying) clay or similar
- stamps
- knife
Potrzebne będą:
- glinka schnąca na powietrzu (lub podobna masa plastyczna)
- stemple
- nóż
|
 Take a small amount of clay, roll it thin and then stamp to surface with your favorite 3rd Eye stamp. If you use a pattern that has lines or checks, you can cut the piece into smaller tiles easily by tracing the lines with a knife. When using a design that doesn't have clear lines, you need to cut the tiles either by freehand or use a ruler. Małą ilość glinki rozwałkowałam;) i postemplowałam moim ulubionym stemplem 3rd Eye. Następny krok to wykrojenie elementów nożykiem.
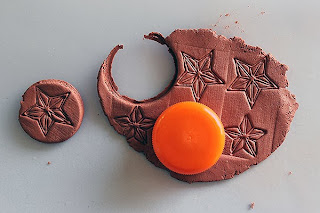
 When working with designs that have the shapes further a part from each other, you can make the shapes separate embellishments by simply cutting them out with a knife or if you want to have a circular embellishment, using a bottle cap or small cookie cutter. Kształty można też wycinać wycinarkami do ciastek lub np. korkiem od butelki. If you don't have any circular elements available, the easy way to make a circular embellishment is to make a tiny ball out of clay, push it flat to the table and then stamp the image on top. Jeśli nie masz nic okrągłego, co nadaje się do wycinania, możesz po prostu uformować z glinki kulę i przycisnąć ją do blatu i wtedy stemplować.
|
You can also make bigger tiles or even cover the whole cover of a book with clay and create the texture there with stamps. Fajne będą też większe płytki - możesz tak ozdobić np. okładkę notesu itp.
|
 |
 |
If you are
using air drying clay, then you can just leave the shapes to dry. You
can also use Fimo clay or similar, but then you need to bake the clay in
the oven. Follow the instructions on the package.
Jeśli uzywasz glinki schnacej na powietrzu - po prostu zostaw kształty do wyschnięcia. Jeśli używasz modeliny itp. - wypiecz / ugotuj kształty. W każdym wypadku - postępuj wg instrukcji na opakowaniu masy plastycznej.
|
Then add the embellishments to your layout as such or color them with acrylics, mists or even watercolors! (in case of air drying clays, for example fimo needs medias for non-porous surfaces)
Pozostał ostatni krok, czyli ozdobienie farbkami, mgiełkami lub nawet akwarelkami (w przypadku glinek absorbujących media, w przypadku np. fimo potrzebne będą media do powierzchni nieporowatych)

*
WOW!!!!!!!
ReplyDeleteThis is so fantastic! Love the colours you have used, but also the composition and use of the clay is just so awesome!
ReplyDelete