Showing posts with label stickers. Show all posts

12/27/14

Goodbye from Riikka


Riikka here today to say "Goodbye"! This is my last post to 3rd Eye blog. It has been an amazing time to share projects here and hopefully inspiring you with them. Like I wrote into the card I made for this post - best time ever. I'm grateful for being on the team and getting to play with the 3rd Eye goodies. 

For the goodbye posts Karolina asked us to choose a favorite product from 3rd Eye. That was a challenge as I love many of the products! I love the flairs or the badges - there's so many to choose from! So many designs and colors to suit every layout and project. I also love many of the stamps - some are perfect for making backgrounds and some are perfect for vocal points. And then there's the chippies and stencils still! But for this post I chose to go with the clock products, both the chippie and the stamp.


Here's the card I created using both the clock stamp and the chipboard. I also included some other stamps to the background and used the 3rd Eye stickers as embellishments, too. 

I started by misting some color to my craft sheet and dragged a piece of patterned paper through the puddle. After drying I added the different stamps in there and then added the stickers to the background. On top I layered a few pieces of patterned paper and then added the chippies on top. I colored the chipboards simply by pushing them to the stamp pad. That gave them an uneven, aged kind of coloring. Lastly I stamped the text and then traced the words with a white pen to get them more visible.


Thank you for stopping by today and thank you Karolina for all this time and creating these beautiful products! I hope I'll see you around! As it's also soon start of the new year, I want to take this opportunity and wish you a creative, wonderful 2015!


Products from 3rd Eye:

stickers TEST-007 chevron stickers TEST-009 cogs - gears TEC-035 clocks checkerboard TES-116  TES-173 best day ever arrows TES-206 clocks set of 3  TES-252 weave - net


12/15/14

Christmas lanterns

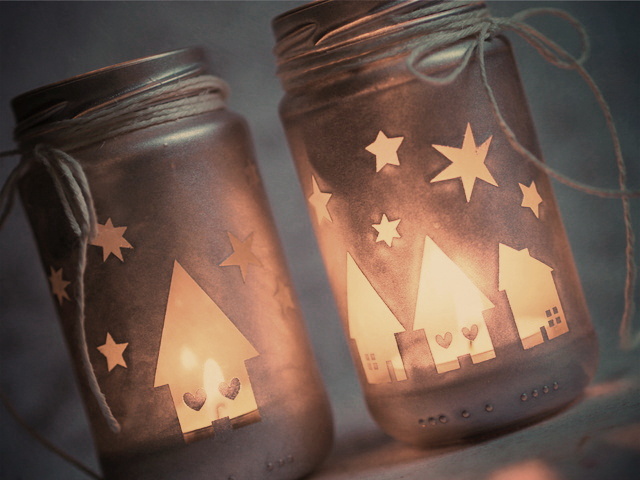
Witajcie! Dziś chcę Wam pokazać mega prosty sposób na wykonanie świątecznych lampionów.
Potrzebne są: słoiczki, naklejki 3rd Eye i lakier w spreyu.
Na czyste i odtłuszczone słoiczki naklejamy wybrane wzory naklejek 3rd Eye a następnie psikamy lakierem. Po wyschnięciu odklejamy naklejki i gotowe! Naklejki łatwiej się będą odklejać po lekkim nagrzaniu nagrzewnicą lub suszarką.
Miłej zabawy!
Welcome! Today I would like to show you very simple way to make Christmas lanterns.
You need: jars, 3rd Eye stickers and silver spray paint.
Stick 3rd Eye stickers on clean and free of grease jars and then apply the paint. Once dry, peel off the sticker and you're done! Stickers will be easier to peel off after use heating tool or dryer.
Have fun!

 
Najedź kursorem myszki aby zobaczyć lampiony wieczorem.. Mouse over to see candles in evening.


Użyłam:/I used:

naklejki  TEST-004 houses domki domy  naklejki TEST-002 stars gwiazdki gwiazdy 

Wesołych Świąt!
AgnieszkaD


12/9/14

Grid design background with stencils - video tutorial


Hello there! Today I'm hoping to spark an idea in your head with this background tutorial. It's really simple but yet effective and you get to play with your stencils! So please check the video underneath to see how I created the background for the layout you see above.


Now that you've seen the steps, let me explain a few things which I didn't have enough space in the video. For starters I tell you why I added the gesso first. It's because gesso creates a layer to the paper that prevents color mediums to soak in. And in order to have those misted bits water-color like blobs instead on circles of mist there needs to be a layer preventing the mist from soaking to the paper immediately. Of course you don't have to use mists to add the color, any color medium will do!

And why then again I'm adding the mist there in the first place? It's just a visual thing - I wanted the grid to have more color than just the amount I can put there through the stencil. So to add a touch of color in there first and then layer the ink on top creates a more colorful background than just using the stencil. If you have a really open stencil (with a lot of gaps) or use the same stencil many times over the grid, you can definitely go without the added color. 


As I typed in the video, I don't mind the "rough around the edges" look. To me that's really appealing and likable. If that's not your cup of tea, you can always draw the shape of your grid to a piece of paper, cut the grid parts off thus creating a stencil of the grid and layer that one together with your stencil to prevent the ink from going over the edges.

Needles to say you can use any colors and any patterns! You can use just one color with different stencils or multiple colors with one stencil or even one color and one stencil. All of the variations create a different mood to your page. As my page is about joy of discovery (my daughter learned to say the harsh Finnish R), I wanted to use multiple colors to have that happy, playful feeling!

Thank you so much for visiting today! I hope I have inspired you! If you have any questions, please just leave a comment or mail me! 


Supplies from 3rd Eye:

TEM003 little stars TEM005 sparks TEM015 Elise's flower TEM024 fall river - autumn leaves TES-252 weave - net TES-212 love hashtag chipboards' sheet TEC-010 stars TECs-006 arrows stickers TEST-011 indian arrows  TEBS017 doodles


12/8/14

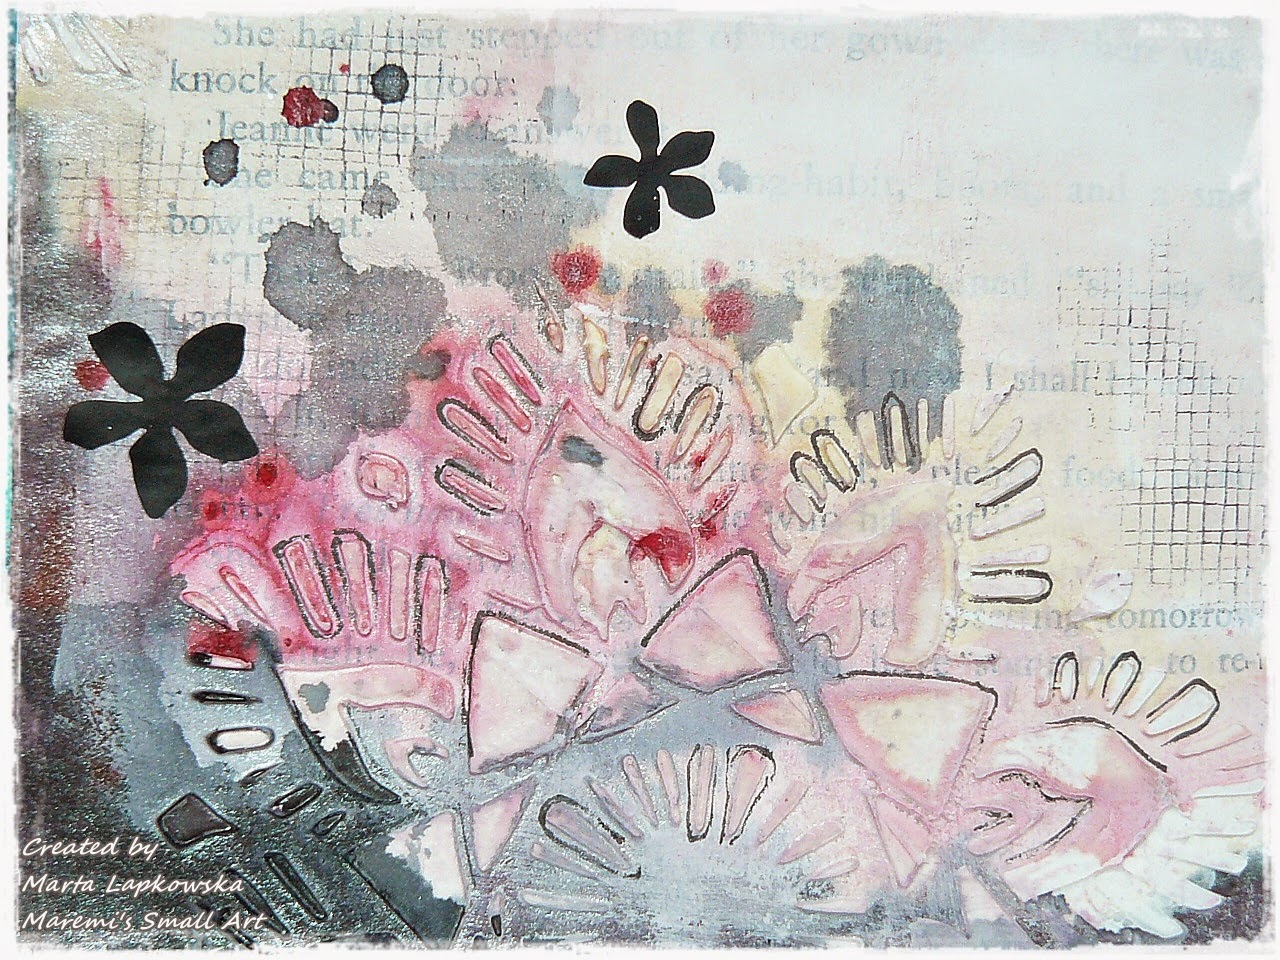
'Never give up...' art journal page by Marta Lapkowska

Mixed media backround created using stamp and stencil.
Pages coloured with Lindy's Stamp Gang sprays.
Black flowers and wording are stockers.

Mediowe tlo stworzone przy uzyciu stempla oraz maski.
Strony nabraly kolorow za pomoca spray'ow Lindy's Stamp Gang.
Czarne kwiatki oraz napisy to naklejki.


Użyłam: / I used:
naklejki TEST-003 flowers kwiaty kwiatki TES-252 weave - siatka kratka splot TEM027 mandala ornament  


9/24/14

Rainy Day Fun


Hi, it's Riikka here to share a layout with you! 

I just love board games! I'm so happy that our girls are getting bigger and they seem to share my love for the games. Their favorite game is one about building princess cupcakes but luckily they enjoy other games too, especially when they can team up with an adult. The picture in the layout was taken in my parent's summer house when we all sat by the table and played. Such a great way to spend a rainy day! 


To get the rainy but fun feeling to the page I used Distress Inks to stamp the background. Before stamping the image I sprayed a little water to the stamp so that the image would be a bit blurry and watercolor like. I used several stamps and used them layered on top of each other. 

I also used the sequin stamp in the project and stamped the image with watermark ink. Then I embossed the sequins with gold embossing powder. I also added some sequins stamped with blue Archival Ink. To build even more layers to the background I used the clock mask and drew around it with a black pen. To balance the blackness I also added a few stamped clocks when the page was almost done.


I didn't happen to have any good blue papers at hand when I was creating the piece so I created some of my own. The striped one I drew with a Copic marker but if you own the lines stamp, you can get the look easier with that. For the other paper I used the tutorial Elina created (link) and the "Sparks" stencil. 

For the embellishments I used 3rd Eye stickers, a flair and a piece of chipboard. It's actually waste from the actual shapes, but I really loved it's look so into the page it went. 


Materials from 3rd Eye:

TES-158 raindrops - rain drops honeycomb 2 (contour) TES-140 cupola TES-223L sequins large  TES-206 clocks set of 3  TEM012 clocks and moth TEM005 sparks TEBA-240 some people feel the rain TEST-002 stars TEST-006 cinema TEC-020 banners

As I was making the page my girls got to join in and make some cards. We all used the same colors and technique in our creations. When the backgrounds were done for their cards, we then embellished them with 3rd Eye chipboard, some clay decorations I had made earlier (link) and some thread.

Thank you for stopping by! Wishing you a delightful day!


Materials from 3rd Eye:

clouds  TES-121 braid  TES-230 Drycha's flower  Emma's flowers TES-097 TES-140 cupola TES-223L sequins large cogs  Lightbulbs  stars  checkerboard TES-116 TEC-020 banners