Witajcie! Dziś chcę Wam pokazać mega prosty sposób na wykonanie świątecznych lampionów.
Potrzebne są: słoiczki, naklejki 3rd Eye i lakier w spreyu.
Na
czyste i odtłuszczone słoiczki naklejamy wybrane wzory naklejek 3rd Eye
a następnie psikamy lakierem. Po wyschnięciu odklejamy naklejki i
gotowe! Naklejki łatwiej się będą odklejać po lekkim nagrzaniu
nagrzewnicą lub suszarką.
Miłej zabawy!
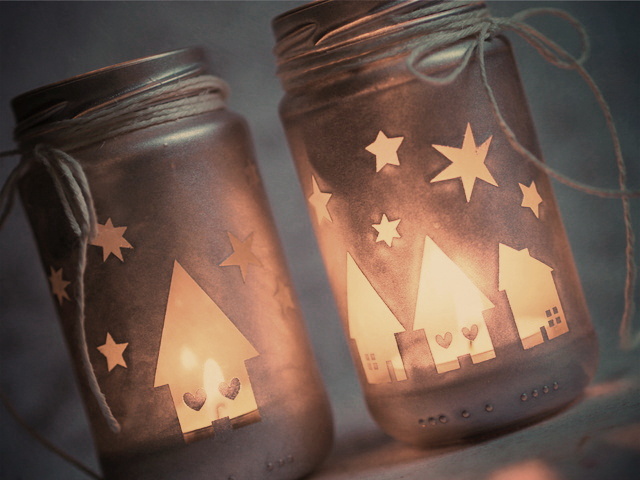
Welcome! Today I would like to show you very simple way to make Christmas lanterns. You need: jars, 3rd Eye stickers and silver spray paint. Stick 3rd Eye stickers on clean and free of grease jars and then apply the paint. Once dry, peel off the sticker and you're done! Stickers will be easier to peel off after use heating tool or dryer.
Have fun!
Najedź kursorem myszki aby zobaczyć lampiony wieczorem.. Mouse over to see candles in evening.
Hello there! Today I'm hoping to spark an idea in your head with this background tutorial. It's really simple but yet effective and you get to play with your stencils! So please check the video underneath to see how I created the background for the layout you see above.
Now that you've seen the steps, let me explain a few things which I didn't have enough space in the video. For starters I tell you why I added the gesso first. It's because gesso creates a layer to the paper that prevents color mediums to soak in. And in order to have those misted bits water-color like blobs instead on circles of mist there needs to be a layer preventing the mist from soaking to the paper immediately. Of course you don't have to use mists to add the color, any color medium will do!
And why then again I'm adding the mist there in the first place? It's just a visual thing - I wanted the grid to have more color than just the amount I can put there through the stencil. So to add a touch of color in there first and then layer the ink on top creates a more colorful background than just using the stencil. If you have a really open stencil (with a lot of gaps) or use the same stencil many times over the grid, you can definitely go without the added color.
As I typed in the video, I don't mind the "rough around the edges" look. To me that's really appealing and likable. If that's not your cup of tea, you can always draw the shape of your grid to a piece of paper, cut the grid parts off thus creating a stencil of the grid and layer that one together with your stencil to prevent the ink from going over the edges.
Needles to say you can use any colors and any patterns! You can use just one color with different stencils or multiple colors with one stencil or even one color and one stencil. All of the variations create a different mood to your page. As my page is about joy of discovery (my daughter learned to say the harsh Finnish R), I wanted to use multiple colors to have that happy, playful feeling!
Thank you so much for visiting today! I hope I have inspired you! If you have any questions, please just leave a comment or mail me!
Hi there everyone! It's Riikka here sharing a background tutorial with you!
There's many text or calligraphy style papers out there right now. You can achieve the same look with some text stamps and a bit of patience. This particular set by 3rd Eye is really great for making this kind of background as with the heart the words form a relatively straight edged rectangular. Having that kind of "block" makes things easier with aligning the words and columns. Of course you could stamp the words to the page one by one, but that would require much more time. With the block you can cover a larger area quickly!
Please watch the video below to see how I created the background for the page above and also for the layout at the bottom of this post!
I used acrylic paint when stamping but simply changing the medium the outcome changes dramatically. Just think about white paper with watercolor like text compared to the one you see above.
Also by changing the color of the background paper you can create a very different mood to your finished page. Just compare the two layouts I made - one with black background and the other with the kraft. The other page is about autumn and other about winter as the season is changing. For the autumn feeling I also used the new leaf stamp and embossed the design in gold to a piece of vellum. There's also 3rd Eye chipboard, a sticker and flairs in the page.
Materials from 3rd Eye:
And here's the other page done with the same tutorial, just aligning the stamps, or the block, differently and using a different color background paper. The mood changes drastically. To give this page more of a winter feel I also added stamped snowflakes in the background as well as white splashes of paint.
I hope you feel inspired by my tutorial and the projects I made using it! Thank you for stopping by today! Also please remember there's plenty of different word stamps in 3rd Eye shop - click here to go browsing and find the one that suits your project the best!
My dear readers, I will share one recipe with you
today.
1.Wybieramy najpierw stemple i na ich wymiar rysujemy kółeczka z na tekturze, które potem wycinamy ..
Brzegi możemy przetrzeć papierem ściernym. First choose the stamps and on their
sizes draw the circles on cardboard, then cut them. You can rub the edges with
the sandpaper.
2. Wybrane stempelki odbijamy na papierze po dwa razy, po jednym na każdą stronę wyciętego z koła. Selected stamps imprint on the paper,
each stamp twice, for each side of the circles cut out of the cardboard.
3. Postemplowane motywy obrysowujemy cyrklem i wycinamy. Tak ok 2mm mniej niż tekturowe kółeczka. Imprinted motifs outline with the
calipers and cut them out. About 2 mm smaller then the cardboard circles.
4. Wycięte motywy przyklejamy z dwóch stron zrób tekturek. The
cut motifs stick with the glue on both sides of the cardboards.
5. Tuszujemy brzegi. Use the ink to paint the edges.
6. Teraz kolej na dziurkowanie i nitowanie. Now it's time for punching and
riveting.
7. Z jednej strony przyklejamy badziki. On the one side stick badges.
8. Doczepiamy koraliki za pomocą kolorowych drucików. Attach beads with the colorful wires.
9. Następnie przyczepiamy sznureczki. Next attach the little strings.
10. Możemy dodatkowo umieścić jakies sentencje na tylnej stronie zawieszek.
Ja wykorzystałam wycinki z gazet. You can also put a sentence (maxim)
on the back side of the hangers. I've used clippings from newspapers.