11/18/14

Jak zrobić małą zawieszkę

Podzielę się z Wami Kochani przepisem :)
Zaznaczam, ze to mój pierwszy tutorial w życiu.

My dear readers, I will share one recipe with you today.


1.Wybieramy najpierw stemple i na ich wymiar rysujemy kółeczka z na tekturze, które potem wycinamy ..
 Brzegi możemy przetrzeć papierem ściernym.
First choose the stamps and on their sizes draw the circles on cardboard, then cut them. You can rub the edges with the sandpaper.


2. Wybrane stempelki odbijamy na papierze po dwa razy, po jednym na każdą stronę wyciętego z koła.
Selected stamps imprint on the paper, each stamp twice, for each side of the circles cut out of the cardboard.


3. Postemplowane motywy obrysowujemy cyrklem i wycinamy. Tak ok 2mm mniej niż tekturowe kółeczka.
Imprinted motifs outline with the calipers and cut them out. About 2 mm smaller then the cardboard circles.


4. Wycięte motywy przyklejamy z dwóch stron zrób tekturek.
The cut motifs stick with the glue on both sides of the cardboards.


5. Tuszujemy brzegi.
     Use the ink to paint the edges.


6. Teraz kolej na dziurkowanie i nitowanie.
Now it's time for punching and riveting.


7. Z jednej strony przyklejamy badziki.
   On the one side stick badges.


8. Doczepiamy koraliki za pomocą kolorowych drucików.
   Attach beads with the colorful wires.


9. Następnie przyczepiamy sznureczki.
   Next attach the little strings.
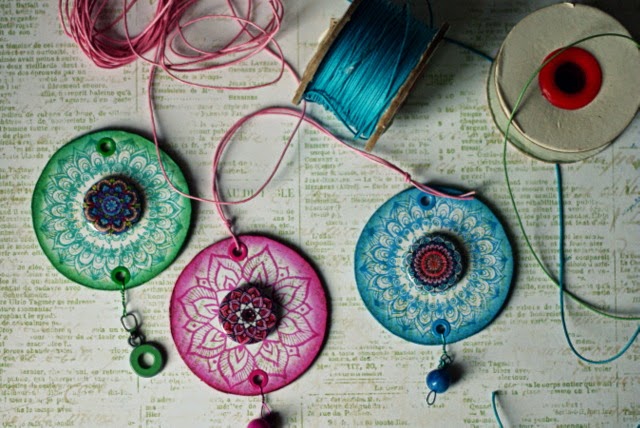

10. Możemy dodatkowo umieścić jakies sentencje na tylnej stronie zawieszek.
 Ja wykorzystałam wycinki z gazet.
 You can also put a sentence (maxim) on the back side of the hangers. I've used clippings from newspapers.


Oto i efekt!
  And here is the effect!


Wykorzystałam stemple:
I've used stamps
oraz badziki
and badges


Miłego tworzenia!
Have a nice creation!
Jyoti

11/14/14

Love, laugh, live

Cześć. Dziś chciałam pokazać Wam, jak przygotowałam tag.
Hi. Today I want to show you, how I prepared tag.


Krok po kroku: / Step by step:


1. Tag pokryłam gesso i przez maskę naniosłam medium żelowe.
1.   First, I overlaid Tag with gesso and through the mask I applied gel medium.


 2. Następny krok to embossing na gorąco i stemple. 
2. The next step is hot embossing and stamps.


3. Do tła użyłam mgiełek. Aby uzyskać efekt przenikania, wszystko spryskiwałam wodą i suszyłam nagrzewnicą.
3. For the background I used the mist. To get the mixing effect, I spraying all with water and then drying heater.


 Moje kolory to: niebieski, brązowy, turkusowy, żółty i różowy.
My colors are: blue, brown, turquoise, yellow and pink.


4. Teraz wystarczy ułożyć kompozycję.
4. Now just lay the composition.


Użyłam: / I used:
TES-255 fall river - liściepismo odręczne TES-105 full of words okrągłe ramki TEC-038 round frames 

11/10/14

autumn cards

Witajcie, z tej strony AgnieszkaD. Dziś pokażę Wam jak zrobiłam tą jesienną kartkę.
Hello, it's AgnieszkaD here. Today I'll show you how I made this autumn card.


Potrzebne będą: stemple 3rd Eye, tusze wodne, biały karton, nożyczki, tusz do tuszowania, ulubione dodatki.

You will need: 3rd Eye stamps, water inks, white cardboard, scissors, favorite accessories.


Na kawałku folii mieszam kroplę lub dwie tuszu z odrobiną wody i stempluję biały karton wybranym wzorem. Ja wybrałam TES-026S leaf.

On a piece of foil I mix a drop or two of ink with a little water and stamp white cardboard with the selected pattern, I choose
TES-026S leaf.


Następnie wycinam listki i tuszuję je. 

Then I cut the leaves and disterss them.
A to już kartka wykonana z użyciem kolorowych, jesiennych listków. Tło kartki potuszowałam i postemplowałam stemplem tulle TES-135.
And this is the card made with colored autumn leaves. On the background I used the stamp tulle TES-135.


i inna stemplowana wodnymi tuszami kartka:
and other water inks stamped card:


Użyłam:/I used:

TES-026S leaf small TES-191 feathers 3  TES-174 best day ever hearts
http://3rdeyecraft.com/en_US/p/tulle-TES-135/166#prettyPhoto 


Miłego stemplowania!
Happy stamping!